Materials: LKB Knife maker, glass strips that are approximately 40 cm x 2.5 cm x 1 cm or 8 mm or 6.4 mm, small paint brush, LKB Knife maker metal fork, lint-free powder-free gloves or lens paper, glass knife holder box.
Procedure:
-
Wash a new glass strip in the sink with warm water, liquid soap and towel paper. Be careful not to cut yourself while handling the glass. Stand the strip up against the sink wall while using towel paper to wash it. Then rinse the strip well in running 2X distilled water. Allow it to dry standing up against some wall.
-
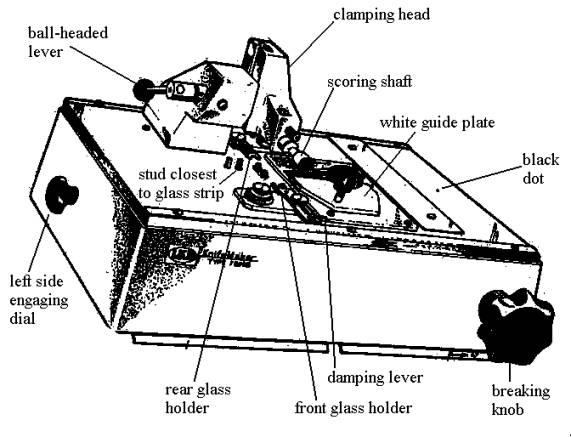
With gloved hands or holding a lens tissue against the broad side of the glass, place the strip, serrated or rough edge down and broad side down on the knife maker. Avoid touching the narrow sides of the strip, as these will be the knife-edges. Position the strip against the white guide plate, which is set at 90-degrees. Also, extend the glass strip as far as the black dot on the knife maker. See diagram of the LKB knife maker
-
Prepare to divide the length of the 400 mm strip into two useable 200 mm strips. Continue to maintain your hold on the glass strip.
-
Lower the clamping head onto the glass strip by flipping the ball headed lever from the back to the front position. This will secure the glass strip in place. Now, remove your hold on the glass.
-
Turn the scoring selector to this symbol for this first major break:

-
The breaking knob should be in the most counterclockwise position at this point.
-
Pull out the scoring shaft all the way. You should hear a faint scratching as the score wheel cuts lightly into the glass. If no score mark is made then prepare to repeat steps by first raising the clamping head (flip ball-headed lever from front to back position). Push score wheel all the way back in. Reposition strip if necessary and maintain hold on glass strip until clamping head is lowered and secured on glass. Then try re-scoring. Repeat this entire procedure again if necessary.
-
Start turning the breaking knob slowly clockwise. The pressure should soon break the glass. As soon as the strip is broken into two halves, reset the breaking knob completely counterclockwise.
-
Raise the clamping head by flipping the ball lever from the front to the rear position. Then push in the scoring shaft. Finally, remove both glass strips.
-
Brush away any glass chips from the knife maker using the small paintbrush.
Making glass squares:
-
Reposition one of the 200 mm glass strips, serrated side down, back into the knife maker. Brace it against the white guide plate and push the strip against the closest metal stud. See above diagram. Do not remove your hold on the glass strip yet.
-
Lower the clamping head until it securely touches the glass. Remove your hold on the glass.
-
The scoring selector should be at the same symbol for bisecting glass strips, and that is the following:

-
Place the metal fork under the glass strip near the stud.
-
Repeat the procedure described in steps #6 through #10. To briefly reiterate, score the glass by pulling out the scoring shaft. Then apply pressure to the strip by turning the breaking knob slowly clockwise. Once the break is completed, reset the breaking knob immediately.
-
Raise clamping head with ball lever, push in scoring shaft and remove the glass square by means of the fork. Place this glass square aside for now.
-
Continue to create more glass squares in the same way as described. Brush away any glass chips.
Making glass knives or triangles:
-
As soon as a glass square is made, one can go on to make many more squares or one can choose to continue working with the same glass square, by rotating the square in place, counterclockwise 90-degrees. Note the two dimples in one corner of the glass. It is this corner that is braced against the front glass holder. The opposite corner is braced against the rear glass holder. To engage the rear glass holder, turn the left side engaging dial forward or in the clockwise direction. This dial is located on the left side of the knife maker.
-
Set the score selector to this symbol for making knives:

-
Place the fork under the glass square.
-
Lower the clamping head with the ball lever to secure the glass square.
-
Pull out the scoring shaft to score the glass.
-
Turn the damping lever clockwise (to a 6 o’clock position, approximately) until the damping pad just touches the glass.
-
Proceed to slowly turn the breaking knob clockwise until the glass breaks.
-
Once the glass breaks, then reset the breaking knob immediately.
-
Reset the damping lever counterclockwise to its three o’clock position.
-
Raise the clamping head and then push in the scoring shaft.
-
Turn the left rear engaging dial backwards or counterclockwise, to release the glass knives.
-
Pick up the two glass knives by means of the metal fork
-
Examine the front aspects of each knife. See diagram:
The sharpest and best cutting edge of the knife will be on the left edge. The right side of the knife, although very irregular, can be used to “rough face” an Epon block. See above.
-
The glass knives are ready to use or can be stored in a dust-free box until ready to use. If a boat attachment is needed, see instructions for these under Special Procedures in Thick Sectioning chapter.
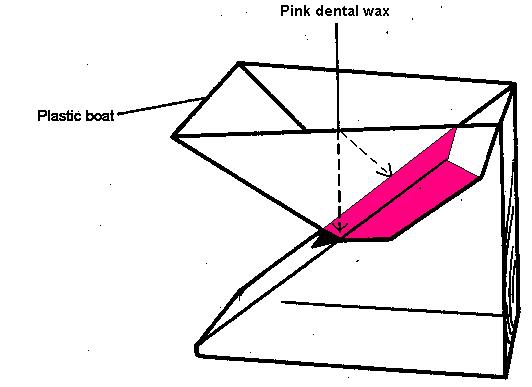
Attaching boats to glass knives:A boat or trough can be attached to a glass knife. The boats, either a pre-shaped plastic or an adhesive tape (Electron Microscopy Sciences, Ft. Washington, PA), are leak proof up to a certain point. Then they must be replaced or the glass knife is replaced. To secure a plastic boat to a glass knife, melted dental wax is needed. See diagram and procedure:
-
Melt some dental wax in a small Petri dish (~60 mm diameter) over a hot plate.
-
Apply some of the melted dental wax to the attachable portions of the boat with a fine artist’s brush.
-
Quickly attach the boat to the glass knife, as diagrammed above.
-
Apply additional melted wax to seal the outside boat edges to the glass.
-
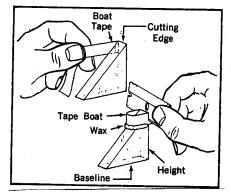
An alternative boat is the silver boat tape. See diagram:
-
Press one end of a two to three inch length piece of tape onto one side of the knife, at the same level as the knife-edge.
-
The rest of the tape is wrapped around the front of the glass knife, as diagrammed.
-
Press the tape to the other side of the glass knife.
-
Trim off the excess tape with a razor blade.