Loading serial sections into Gimbols or Hexagonal Rings
The following two procedures are for securing a grid into a specialized metal ring holder. One protocol describes gimbol sets, manufactured by Advanced Microscopy Techniques (Danvers, MA). The gimbols fit into the rotational holder for the JEOL 1200 EX electron microscope. The other protocol describes hex rings, manufactured by Gatan, Inc. (Warrendale, PA). A grid is glued to a hex ring, which then is placed in the Gatan rotational holder. This holder is then used in the JEOL 2010 electron microscope. The gimbol technique will be described first.
A. Loading grids in gimbol sets
Materials needed: gimbol sets which includes the outer gimbol ring and inner ring clip, gimbol holder, Plexiglas box stage, clean curved forceps, grids, clean straight forceps, gimbol stretcher tool, Ross Lens tissues, gooseneck lamp (optional), colored tape, pen, razor, clean gelatin capsules (Electron Microscopy Sciences, cat # 70101), pillboxes.
-
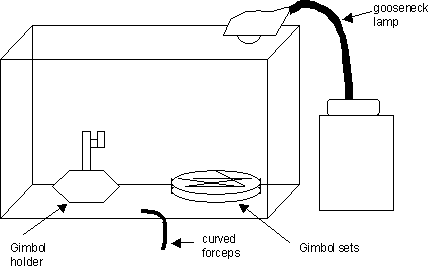
Assemble a clean work area as diagrammed:

-
Line the floor of the Plexiglas box with Ross Lens tissue. This will provide a clean surface in case any grids fall to this floor. Clean the gimbol holder with 70% ethanol and then wipe dry. Clean all forceps with 70% ethanol also and dry them too.
-
Prepare paper tape labels for the gelatin capsules. To do this: from a 1” wide roll of colored paper tape, cut off several 1” lengths. Tape these lengths to a clean surface, e.g., a glass slide, so each may be labeled in pen or pencil. Include the following information:
-
Epon block name, e.g., SK Slice 1A
-
Series #
-
Grid #
-
and any other pertinent information.
-
Once the grid is placed in the gelatin capsule, then the tape label can be wrapped around the capsule.
-
The inner ring clips have to be pre-stretched so that they will fit securely into the outer gimbol. To do this, place two clips on the wider tip of the stretcher tool for at least several minutes. See diagram:

-
While the clips are stretching, place a gimbol, using the curved forceps, into the gimbol holder with the narrower base facing down. Secure the gimbol in the holder by turning the attached tightening screw.
-
Using the straight forceps, transfer a Synaptek grid or any grid that needs to be rotated in the electron microscope, tissue side down (also film side down), into the gimbol. Make sure the grid is seated in the gimbol properly. Sometimes it will not lie flat, so try very carefully to tamp the grid into place with closed forceps. Alternatively, release the gimbol from holder and then tip the gimbol over a clean Ross Lens tissue so the grid can fall out. Then place the gimbol back into the holder and re-secure it. Then try re-inserting the grid into the gimbol.
-
Once grid is in place, remove a clip from the stretcher tool with curved forceps. With the same curved forceps, pick up the clip, with the wide band of the clip facing downward and squeeze the clip closed. See diagram:

-
Then insert the clip, wide band down, into the gimbol, atop the grid. Then, push the clip down further into the gimbol, using the flat part of the forceps handle. This forms a secure cassette to hold the grid.
-
Place the grid/gimbol unit into a gelatin capsule and tape it closed with an appropriate tape label.
-
When all grids are gimbolled and placed in capsules, then place all capsules into a tiny zip-lock plastic bag (optional). Place this bag into a labeled pillbox for storage.
-
When receiving new gimbol sets from the manufacturer, it is necessary to inspect and clean them. Examine each gimbol and clip under high magnification and with forceps, remove any burrs. Use Dust-Off to blow away any dust or particles. Then sonicate the gimbol sets in several brief changes of 100% acetone, under a fume hood. Dispose of the rinse acetone in an appropriate waste container. Allow the gimbol sets to dry under the fume hood for 5 min or more. Then store away the sets in a clean container for future use.
-
Gimbol sets can be recycled. To remove a grid, reverse the steps described above. That is, place the gimbol set in the gimbol holder and secure tightly. Use the curved forceps to remove the inner clip. Then remove the gimbol from gimbol holder with the curved forceps. Next, flip the gimbol over to release the grid onto a clean Ross Lens tissue. Place the (hopefully) unbroken grid back into its original grid box.
-
Wash the gimbols by sonicating in 100% acetone, 3 changes at 5 minutes each change, under the fume hood. Pour off the rinse acetone and allow them to dry in the fume hood for 5 min or more. If the gimbols are really dirty and blackened from the electron beam exposure, they can be more thoroughly cleaned in 10% glacial acetic acid (aqueous). Just sonicate them in the solution for several minutes. Then rinse them thoroughly in 2X-distilled water. Next, sonicate the gimbol sets in three changes of 100% acetone to dehydrate them. Finally, allow them to air dry in the fume hood. Once dry, store the gimbols in a clean container. They may have to be re-inspected before use for any over-looked burrs or dust.
B. Loading grids on Gatan hex rings
Materials: Clean plastic Petri dish sets (90 mm diameter), white Teflon grid loading trays (about 42 x 70 x 6.5 mm thick with two rows of holes that are 4 mm diameter and 2 mm deep, approximately – see diagram)
Devcon High Strength 2 Ton Epoxy glue or any high strength clear glue, Gatan hex rings, clean glass microscope slide (preferably 75 x 50 x 1 mm, but 75 x 25 x 1 mm is acceptable), 1 pair clean curved forceps, 1 pair clean straight forceps, Pioloform-coated Synaptek grids, stereomicroscope (SM) or any grid that requires rotation in electron microscopy, can of Dust-Off, pen, light source, labeling tape, Ross lens tissue, thin cylindrical wood applicator sticks or toothpicks.
Procedure:
-
Place all above materials on a clean desktop. Place light source near the stereomicroscope (SM) head to aid in viewing.
-
Blow or wipe out any dust or debris from all grid-storing surfaces; this includes the glass microscope slides, the interior of plastic Petri dish set, all of the holes and surfaces of Teflon loading tray. Use Dust Off and/or Ross lens tissue. Critically look for any dust on these surfaces under the SM.
-
Place the cleaned glass microscope slide under the SM for viewing
-
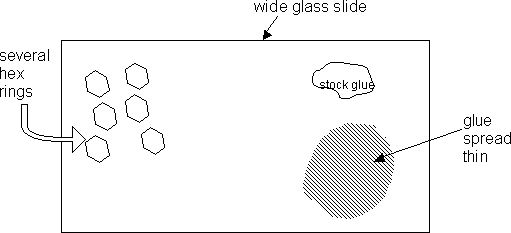
On one corner of the slide, prepare a small amount (about the size of a dime) of the Devcon Epoxy glue, according to instructions on the package. From the stock glue, withdraw a smaller amount of the glue using the wooden stick. Then use the stick as a rolling pin to thin out the glue in a nearby area.
-
Place several hex rings, using the curved forceps, on the opposite area of the slide. See diagram:
-
Using the curved forceps, grasp a hex ring around its diameter, hex side up, and transfer it to the thinned area of glue. Avoid getting glue on the forceps. If there is glue on the forceps, then wipe it clean with a Ross Lens tissue. Then pick up the hex ring from the glue and place it down on a clear area of glass to “blot” off excess glue. Blot up to 2X if necessary. It is important to discard hex rings that have glue “riding” up on its sides. These discarded rings can be cleaned later. Only use the hex rings with glue on the bottom end of the ring. If the thread part of the ring has glue on it, as far as you can tell, then don’t use this hex ring. Proceed to start again with gluing a new hex ring. Use the SM to see what you are doing.
-
Grasp the hex ring again, around its sides and invert it as you place it in the first hole of the Teflon tray. Alternatively, invert it on the glass slide, and then transfer it to the first hole. The glue side of the hex ring should now be facing up. This will be considered grid #1. Wipe any sticky glue off the forceps, if necessary, with Ross lens tissue.
-
Use the clean straight forceps to pick up the first Synaptek grid (of a series). While viewing under the SM, carefully load the grid, tissue/Pioloform side down, atop the glued end of the hex ring. The glued periphery of the hex ring should contact the periphery of the Synaptek grid. Use the point of a pair of closed forceps to center the grid properly, if needed.
-
Keep the grid tray covered in a clean Petri dish set to minimize dust exposure to the grids.
-
Glue the remaining grids in the same manner.
-
When one tray of grids is complete, then store it in the Petri dish set in a safe place, free from any disturbance. Allow all the grids to dry at least 8 to 24 hours or longer. Then transfer the grids into gelatin capsules for permanent storage.
-
To clean off hardened glue on unused hex rings or on forceps, sonicate in several or more changes of 100% acetone, or in 100% methyl ethyl ketone.


