Thin sectioning generally follows the thick sectioning of a block.
Before thin sectioning any block, determine if the trapezoid must be made smaller. The recommended size is less than 1 mm for the base of the trapezoid and less than 1 mm for the height. Remember to make the top and bottom of the trapezoid as parallel as possible.
Materials needed: very new glass knives or good diamond thin sectioning knife, clean 2X distilled water in a small flask, thin plastic pipettes (Samco Transfer pipets, cat# 202), Ross Lens tissue, 4 to 6 pairs of clean, very fine forceps (Dumont #5, #7), 4 to 6 clean eyelash sticks, (to clean eyelash hairs or forceps use a Kim Wipe that is moistened with 70% ethanol and wipe clean each hair and prong), Synaptek (Ted Pella, Inc, cat# 4514) Pioloform-coated (Ted Pella, Inc cat# 19244) grids, or copper mesh grids or nickel grids, grid storage box (Leica, cat# 705525), styrofoam cleaning stick, ultramicrotome (Leica Microsystems Inc., Bannockburn, Il), draft shield, air table (Technical Manufacturing Corp., Peabody, MA).
Procedure:
- If your Epon block has just been thick sectioned and has remained undisturbed in the microtome, then alignment with the thin sectioning diamond or glass knife should require minimal changes. If, on the other hand, the block has just been placed in the microtome, then do a very careful initial alignment with a glass knife. Only then switch to the new glass knife or diamond knife. Never do a first alignment on a block face with the thin sectioning diamond!!!! You can easily damage it!!!!
- If using the diamond knife, remember to pre-fill the boat with clean water, at least 20 to 30 minutes before use. This will allow the knife-edge to become more hydrophilic.
- Students will continue to use glass knives for thin sectioning until they are very proficient at it. Only then can they graduate to using the diamond knife.
- Turn on the compressed Nitrogen supply to the air table. Place the diamond or new glass knife with attached boat into the knife holder and secure tightly (finger tight that is!). Fill the boat with clean water until it is level with the knife-edge.
- Set the clearance angle to 6 degrees. Most diamond knife manufacturers' recommend this angle.
- Set cutting speed to 1mm/sec. Set thickness setting to 40 to 60 nanometers (nm) for silver to platinum sections, depending on the particular research requirement.
- Set the length of the cutting window. Turn off overhead lights to reduce distraction, if so desired. Place the draft shield on the microtome.
- Align the knife to the block very carefully. Use only the bottom light source in order to observe the knife's reflection on the block face (seen as a white shadow). Increase the magnification if needed. Remember to retract the knife before making any adjustments.
- Once alignment is achieved, then advance the knife fairly close to the block face, using the fine advance control. Note that, as the knife is moved closer to the block face, the thin white shadow line changes to green, then to red. This green/red proximity is close enough. Now, turn on the microtome power and wait patiently for thin sections to be cut. Do not disturb the microtome or its air table, during the cutting phase.
- Look through the binoculars to see how well or badly the sections are being cut. If there are certain problems, e.g., sections drag over the block edge, water on the block face, then refer to the trouble-shooting chart located in our cutting room or refer to any good textbook on electron microscopy techniques for resolutions. To stop the cutting at any time, stop the microtome when the block is on the down swing, i.e., when the block is below the level of the knife. Before turning the microtome back on, retract the knife about 0.5 um to 1 um, and then turn on the microtome. The reason for this margin of safety is that some microtomes may skip ahead when started up again. Retracting the knife a bit will prevent a thicker section from being cut. A very new and well-calibrated ultramicrotome should not have this problem, and it should be safe to stop, and then start the cutting motion.
- When unwanted sections or debris is floating on the water surface, use a small piece of Ross Lens tissue to wipe them away.
- If sections are stuck on the knife-edge, use the eyelash attached to the wooden stick to pry them loose. Never touch the diamond edge unless you use an eyelash hair or styrofoam cleaning stick.
- Replenish the boat water when needed or remove water if over-filled, using a very thin plastic transfer pipette.
- When ready to pick up sections, stop the microtome on the down swing. Retract the knife.
-
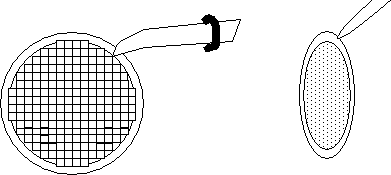
With the fine forceps, pick up a coated Synaptek grid or a mesh grid as diagrammed:

Be careful not to puncture the Pioloform film coat. Place the tips of the forceps at the 1:00 o'clock position, as diagrammed above, but at some safe distance from the film-covered open slot area.
Examine the coated grids under the binoculars to see if any holes or imperfections are present. Discard any imperfectly coated grids. Also, discard any bent grids. -
One of several ways to pick up sections on grids:
A)Submerse the grid completely under the water and position it just beneath a floating section (s). Use the eyelash hair (attached to the wooden stick) in your other hand, to keep the section "corralled" in the vicinity of the grid. When it seems that the section is "on" the grid, then the pull grid straight up out of the water. Hopefully the section is attached to the grid. See diagram. Then, place the forceps/grid aside to air dry for several minutes.

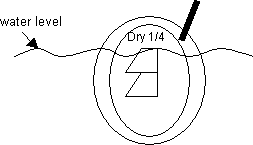
B) Another method is to only submerse the grid 3/4 deep under the water. See diagram. Use the eyelash hair to "corral" the section to the dry top 1/4 area of the grid. When the section appears very close to the dry region, then pull grid straight up out of the water. This technique seems to work well for the coated grids. Put forceps/ grid aside to dry.

- Examine the sections on the grids under the stereomicroscope to determine if there are any problems. Are the sections dry yet? Are the sections too wrinkled? How are the sections oriented on the grid? You may choose to discard badly wrinkled sections. Note also if there is still any water between the prongs of the forceps. If so, wick this water dry with a single wedge of filter paper. Otherwise, the grid will not release from the forceps when you try to place it in the grid box. Once the grids are completely dry, place the grids in the grid box.
- Continue to pick up all the thin sections needed. Place all the grids in the grid box for storage. To air dry them well, leave the grid box cover off. Instead, place a clean sheet of Ross lens tissue over the grid box holes. This will protect the grids from dust. Allow the grids to air dry in this way for 1 to 3 hours or overnight.Then stain them immediately, or on the next day at the latest, with uranyl acetate, followed by Reynold's lead citrate (see grid staining chapter).
- When finished thin sectioning, clean and store away the diamond knife as instructed in the previous "Thick Sectioning" protocol. This includes lightly sweeping the diamond edge with a 100% ethanol-soaked beveled styrofoam rod. Then rinse the diamond edge thoroughly under running 2X-distilled water. Then examine both sides of the diamond edge under the stereomicroscope for any residual debris. Re-clean with styrofoam rod if needed. Then allow the diamond knife to air dry for 5 to 10 minutes. Then store the diamond knife away in its box.
- Turn off the air table when finished with the ultramicrotome.